Step-by-step procedure for removing the gearbox from a VAZ 2110 car and installing it back. Read on for how to do it right.

Removing the gearbox is extremely difficult, so you need to find a second person to help.
Sequence of removal and installation of the gearbox:
1. First, the battery must be removed, then the oil is drained from the gearbox and the starter is removed.
2. Then disconnect the clutch cable, which is connected to the clutch release fork. The cable is in the bracket on the box, it must be removed from there.

3. The speed sensor is connected to a block with wires. The terminal block with wires must be disconnected by squeezing the spring clips.
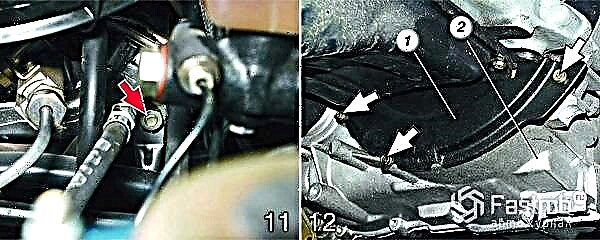
4. Unscrew the bolt (number 1 hectare of the photo), which secures the bracket for the ignition module and the gearbox. Unscrew the two bolts on the upper mount of the box to the engine. In this case, it is necessary to remember that the bolt (2), which is in front of the machine, is short, and the bolt (3) is long.

5. The reversing light switch is connected to the block with wires. Disconnect the terminal block from the bottom of the machine.
6. In the place where the tie rod bracket is attached to the gearbox, unscrew the two bolts.

7. The shift rod is connected to the pivot of the selector shaft. It is necessary to loosen the connection by unscrewing the clamp bolt a little, and move the rod back from the hinge. 8. Remove wheel drives. In one drive, insert the plug and tie it with something so that it does not fall out when the box is removed. The drive, which is on the right, can only be swiveled to the side by disconnecting it from the box and attached to the body.

9. To make it convenient to remove the gearbox, you need to unscrew the two bolts, which are located on the fastening of the left ball joint and the steering knuckle, and disconnect them.
10. Unscrew the nut located on the lower right gearbox mount (1) towards the engine as viewed from the engine side. But some car models have a fuel injection system, and under this nut there is a support bracket (2) for the intake pipe. This bracket must be removed from the stud.

11. If it is difficult, you can loosen the tightening on the upper bracket fastening nut.
12. In the clutch housing (2), unscrew the three bolts on the lower cover fastening (1) and remove this cover.

13. On the fastening of the gearbox to the engine, unscrew the bolt in the lower left corner.
14. Drive the engine out with a board or hoist.
15. On the fastening of the left support of the power unit, unscrew the nut at the bottom of the car.

16. Where the rear support of the power unit is attached to the body, unscrew the two nuts.
17. The rear support of the power unit is connected to the gearbox. Using a second wrench, which needs to hold the nut so that it does not rotate, unscrew the two bolts on the support fastening to the box and remove the support.

18. In order to remove the gearbox from the guide bushings, insert a screwdriver in the middle of the cylinder block and clutch housing. The gearbox must be supported.
19. Then move the transmission as far back as possible. To do this, it is necessary that the rear cover of the box passes over the extension of the front suspension (in this case, the input shaft must come out of the clutch). If the input shaft does not come out of the clutch, then you need to push the engine to the side. This is done by lowering the front end of the box and lifting it from under the machine.
20. After the performed procedures with the gearbox, it must be installed back. This must be done in reverse order, as it was filmed. When the box is installed, it is necessary to add oil, and adjust the gear lever and the clutch release drive.